 it's the end of the year, today in about 13h and looking back on 2011 i had an awesome spring and summer, with lots of travelling and even though the weather sucked so much, we made the best of it and had beautiful holidays. when autumn and finally winter arrived everything got kinda bad, i had lot's of trouble and all i hope for 2012 is that i won't do the same mistakes again and i really hope we'll have a lot of sunshine in the summer next year, since i won't be able to travel that much.. sadly. i know, new years resolutions are stupid, and i have only one, wich is to get that fucking university place to study product/industrial design - and i need to work a lot, draw a lot and successfully participate on qualifying examinations, to make this dream come true finally. i also wanted to thank you, all my lovely readers, for that great support in 2011, you're so sweet! ♥ ♥ ♥ and hopefully you're gonna have a wonderful 2012 and a beautiful new years eve, with all the people you love around! HAPPY NEW YEAR. ♥
the end - again.
it's the end of the year, today in about 13h and looking back on 2011 i had an awesome spring and summer, with lots of travelling and even though the weather sucked so much, we made the best of it and had beautiful holidays. when autumn and finally winter arrived everything got kinda bad, i had lot's of trouble and all i hope for 2012 is that i won't do the same mistakes again and i really hope we'll have a lot of sunshine in the summer next year, since i won't be able to travel that much.. sadly. i know, new years resolutions are stupid, and i have only one, wich is to get that fucking university place to study product/industrial design - and i need to work a lot, draw a lot and successfully participate on qualifying examinations, to make this dream come true finally. i also wanted to thank you, all my lovely readers, for that great support in 2011, you're so sweet! ♥ ♥ ♥ and hopefully you're gonna have a wonderful 2012 and a beautiful new years eve, with all the people you love around! HAPPY NEW YEAR. ♥the galaxy sweater
 i could die over the awesomeness of that sweater - finally i ordered it on ebay and i can't wait to recieve the package, wich is in about 2 or 3 weeks.. sadly.
i'm not insane! - well, i am.
 christmas is over, i feel like a walrus - because i ate too much and became fat and sluggish - but i'm enjoying FRINGE BINGE right now, a worldwide synchronous marathon to watch fringe from the first episode of season one and that takes at least three days to complete to the last one shown on tv, wich is season four already acually. i'm not insane, i won't watch all day long, but i love to take part in the evening, right now we're at episode six of season one. who else got a crush on fringe?
lomography

 some random photos i took in the last months using my HOLGA.. i got the film developed last week and yesterday i picked it up and i have to say that really many photos got surprisingly absolutely nice, these three are my favourite ones. so if you wonder what this strange white thing is the girls are drinking, it's 'schneemaß', a mix of vanilla ice cream, lemon soda and liquor - i would translate 'pint of snow' because it looks like liquid snow actually - and tastes fucking weird - no, it's disgusting. well, i prefer hot wine punch as a drink for winter and lately i discovered my fondness for tea - yum.
well, today's christmas. what a pitty all the snow we had the day before yesterday is gone.. i would have really liked a white christmas after we've been having none for years around here.. never the less i hope you enjoy this wonderful day and get a lot of beautiful presents! ♥ ♥
MERRY CHRISTMAS!
DIY cotton bag
 you wouldn't believe it but i actually learned to use a sewing machine and my first project were those cotton bags wich i sewed out of some white cloth i bought some time ago. the two bags on the photo are presents but i've got a third left, i just don't know yet what to paint on it.. either some quote or something related to this blog, some pink brain - maybe both combined - or i just paint the two sides in different ways and use the one that goes better with the outfit i'm wearing, don't know.. but: cotton bags are lovely. ♥
amethyst sparkles
 i really had an amusing weekend, the girls and i made a small trip by train, visiting a wonderful and snuggish city (regensburg, for all the german readers..) and it's christmas market.. of course we also checked out some of the stores there and i finally found a pair of corduroy pants on sale at h&m - they were just 10€ so i had to get them! and i also bought this absolutely beautiful amethyst pendant, wich i really love and i can't wait to put it on a necklace.. so it was a very nice evening, we drank lot's of hot wine punch, ate christmas cookies and other delicious things they sold on the market and i really love train trips with my girls anyway, we did at least three of them this year, we went to rome, lake garda and now we started doing small city trips - wonderful! i can't do anything, but it always gives me that kind of harry-potter-feeling..
THANK YOU SO MUCH FOR 50 READERS! I CAN'T BELIEVE IT, REALLY, I LOVE YOU! ♥ ♥ ♥
DIY recycled plastic bag pouch
looking for some inspiration for future DIY projects - especially xmas present DIYs - i found a pretty awesome tutorial online at instructables.com and i thought i'd really have to share it, it's cheap and actually so unbelievably benefitial for our environment - a cute little pouch, made from old plastic or potato chips bags.
 here's what you need: 1 a emty candy, shopping, potato chip or just any plastic bag you like (you might need two if you want to use the more beautiful sides..) 2 two transparent pieces of plastic in the size of your plastic bags (you can simply cut one of those foils where you can put sheets of paper in to protect them) 3 two pieces of fabric, slightly bigger than the plastic bags 4 a zipper 5 a needle and yarn or a sewing machine 6 some scissors, pencil, ruler
 1 place the zipper (right side up) on the fabric (right side up)
 4 put the second piece of fabric under the part you just finished (foil,plastic bag and fabric of the first side should be on one side of the zipper, the new fabric should be right side up, just as the zipper)
 7 put the fabric and plastic (bag+foil) sewn to the left side of the zipper to the left and the fabric and plastic (bag+foil) sewn to the right side of the zipper to the right and open the zipper
 9 turn your bag to the right side (be patient! you don't want to ruin your work!) and sew the hole in the fabric right where the pink dots are. push the fabric to the inside of your pouch and YOU'RE DONE!
 might seem a little bit complicated, but i promise you, while making the pouch every step is going to be very clear and i actually made two of them already and they're in fact easier than you might think from the first view.. try it and - as a tiny side effect - you'll be saving our wonderful planet.
here's what you need: 1 a emty candy, shopping, potato chip or just any plastic bag you like (you might need two if you want to use the more beautiful sides..) 2 two transparent pieces of plastic in the size of your plastic bags (you can simply cut one of those foils where you can put sheets of paper in to protect them) 3 two pieces of fabric, slightly bigger than the plastic bags 4 a zipper 5 a needle and yarn or a sewing machine 6 some scissors, pencil, ruler1 place the zipper (right side up) on the fabric (right side up)
2 place the foil and then the first half/piece of the plastic bag (wrong side up) on the fabric and zipper and sew right where the pink line is (fabric, zipper, foil and plastic bag should be sewn together)
3 flap the foil and plastic bag to the top and sew where the pink line is, nearby the actual zipper.
4 put the second piece of fabric under the part you just finished (foil,plastic bag and fabric of the first side should be on one side of the zipper, the new fabric should be right side up, just as the zipper)
5 revise step 2: place the foil and plastic bag (wrong side up) and sew everything together right where the pink line is
6 revise step 3: flap foil and plastic bag and sew where the pink line is drawn
7 put the fabric and plastic (bag+foil) sewn to the left side of the zipper to the left and the fabric and plastic (bag+foil) sewn to the right side of the zipper to the right and open the zipper
8 flap the plastic parts to the one and the fabric parts to the other side, make sure that the to sides of the open zipper are in line and sew where the pink line is. leave a little bit of space to turn your bag and cut the unnecessary fabric and plastic around your seam after sewing
9 turn your bag to the right side (be patient! you don't want to ruin your work!) and sew the hole in the fabric right where the pink dots are. push the fabric to the inside of your pouch and YOU'RE DONE!might seem a little bit complicated, but i promise you, while making the pouch every step is going to be very clear and i actually made two of them already and they're in fact easier than you might think from the first view.. try it and - as a tiny side effect - you'll be saving our wonderful planet.the shorts
 you might remember my dyed denim shorts i've been talking a lot about recently, and now i decided to customize them a little bit more by studding the inside of one back pocket with some golden round studs.. to do that i first ripped the left side of the pocket with the seam ripper and just flapped it to the other side.. i sewed it right where the original seam of the left side was to keep it in place.
 after that i started studding.. it took me about 150 of the 8mm studs and several hours to finish it, but i think it looks totally awesome! i first wanted to use my spray painted gold pyramid studs but it turned out that the colour is easily crumbling off and i couldn't really get any kind of even pattern.. so i decided to rather use them on a bag (a DIY studded cotton bag - tutorial upcoming!). so i finished 4 of my 6 high waisted shorts, i just need the american flag one and the distressed one and then, i promise, i'm going to style different outfits and show them all, finally worn, to you!
PS: freakin awesome: i hit the 10,000 visitors today! thank you all so much for reading - that stupid brain slush actually - and commenting - i l♥ve you!


DIY studded iPod case
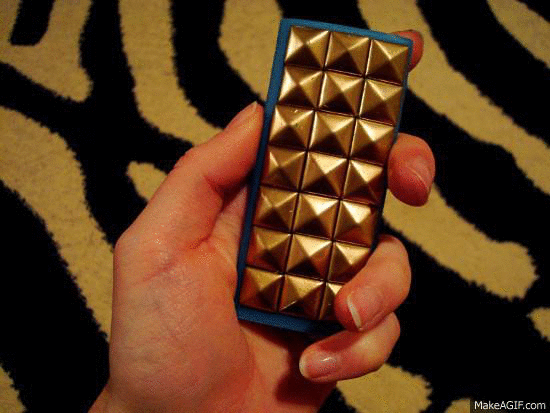 sometimes i can't even believe how surprising the world is - i found a pack of three iPod silicone cases (actually fitting my 4th generation nano) for unbelievable cheap 10ct at a local store! since i'm not going to waste anything i decided to try studding one of the cases, first i tried some hot glue, but that didn't work, so i did it the classical way, just pushing the spikes through the silicone. and how amazing is the result, huh? - i love it.
DIY braided hex nut bracelet
 i recently discovered a pretty awesome website, HONESTLY...WTF, including lot's of DIY-tutorials, some of them, like the DIY braided hex nut bracelet i already tried out and i think they're just beautiful.. and astoundingly cheap. you'd just have to ask your dad for some hex nuts - or even square ones (bracelet on the right) - and all you need to get is some twine, wich isn't very expensive, too. those bracelets are so easily and quick made, you should really try it out and also don't forget to take a look at the website, they've got so many amazing things there..
bone heels.
 how can any pair of heels be more awesome than those? never. so it's out of question that i absolutely need to have them. there's only one thing - in shoes - i desire more: a pair of creepers. and i actually already found a pair for 40$ from hongkong, but i'm not sure yet, if i really want to have leopard ones.. they look super cute and actually i have way too much simply black shoes, so.. doesn't matter now, i haven't got any money at the time anyway - at least not 40$ to spend on another pair of shoes..
Subscribe to:
Comments (Atom)